ServiceNow – ChatGPT – Image Generation (Dall-E)

I thought it would be interesting to do some image generation with ChatGPT, so I started using the Dall-E APIs that ChatGPT have provided.

This configuration allows you to generate images via script and attach them to a record.

To do this, firstly you will need to run through this article to get a basic ChatGPT configuration on your environment.

Once you have got that setup, you are ready to continue. Firstly, we need to add a new REST message endpoint. Open the “ChatGPT” REST message and create a new HTTP method.

NameImage
Http MethodPOST
Endpointhttps://api.openai.com/v1/images/generations

Next, we are going to create a brand new script include. This extends from the ChatGPT script include that was created in the initial configuration. Create a new script include with the following details:

NameChatGPTImageProcessing
DescriptionProvides Dall-E API configuration.
var ChatGPTImageProcessing = Class.create();
ChatGPTImageProcessing.prototype = Object.extendsObject(global.ChatGPT, {
    initialize: function() {},

    createImage: function(requested_image_text) {
        try {
            //this.logDebug("Submitting chat messages: " + JSON.stringify(messages));
            var request = new sn_ws.RESTMessageV2("ChatGPT", "Image");
            var payload = {
                //"model": "dall-e-3",
                "model": "dall-e-2",
                "prompt": requested_image_text,
                "response_format": "b64_json"
            };

            this.logDebug("Payload: " + JSON.stringify(payload));
            request.setRequestBody(JSON.stringify(payload));
            request.setRequestHeader("Content-Type", "application/json");
            var response = request.execute();
            var httpResponseStatus = response.getStatusCode();
            var httpResponseContentType = response.getHeader('Content-Type');
            if (httpResponseStatus === 200 && httpResponseContentType === 'application/json') {
                this.logDebug("ChatGPT Imaging API call was successful");
                this.logDebug("ChatGPT Response was: " + response.getBody());
				// Get the base64 response and return it
				var parseResponse = JSON.parse(response.getBody());
				var base64Response = parseResponse.data[0].b64_json;
                return base64Response;
            } else {
                gs.error('Error calling the ChatGPT API. HTTP Status: ' + httpResponseStatus + " - body is " + response.getBody(), "ChatGPTImageProcessing");
            }
        } catch (ex) {
            var exception_message = ex.getMessage();
            gs.error(exception_message, "ChatGPTImageProcessing");
        }
    },

    addImageAsAttachment: function(record, chatGPTResponse, fileName) {

        // Make sure the filename has .png at the end
        fileName = fileName.contains(".png") ? fileName : fileName + ".png";

        // The image API responds using either a URL or base64. We will use base64 as we can use that to attach it.
        var base64Bytes = GlideStringUtil.base64DecodeAsBytes(chatGPTResponse);

        var gsa = new GlideSysAttachment();
        var attachmentId = gsa.write(record, fileName, 'image/png', base64Bytes); // Write the attachment to the record.
        gs.print('Attachment created successfully: ' + attachmentId);

    },

    type: 'ChatGPTImageProcessing'
});

There are two functions here – firstly the createImage function which generates the image into base64 code. Secondly, the addImageAsAttachment function which will add the newly generated image to the GlideRecord you provide.

To test this, run the below fix script. It should add a new image called “cartoon_cat.png” to the fix script.

NameChatGPTImageProcessing Test
DescriptionTesting ChatGPT image processing
var fix_script = new GlideRecord('sys_script_fix');
if (fix_script.get('9f0dea4193400210d6f7fbf08bba10d4')) {
    var si = new global.ChatGPTImageProcessing();
    var image = si.createImage("Create an image of a fluffy cartoon cat that is wearing sunglasses");
    // Attach the image
    si.addImageAsAttachment(fix_script, image, "cartoon_cat.png");
}

If everything goes well, it should attach a file (you might need to refresh the script after running it to see the attachment):

The image it made me was this! I thought it was pretty cool.

ServiceNow – Adding an Animated VIP Icon

I wanted to find a method that would make an incident stand out if it was logged for a VIP user. There is a field decoration (I believe its out of the box) that shows like this:

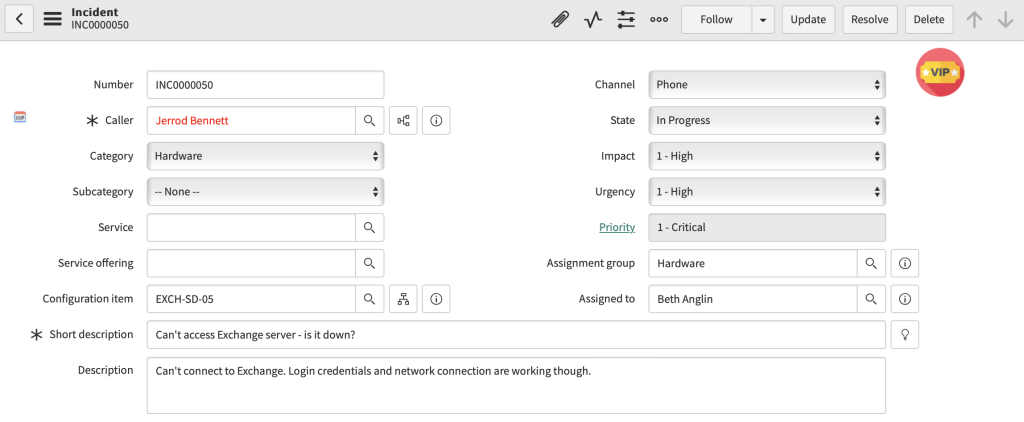
But I felt that we could get a bit more “pop”. I wanted the engineer to have visibility that this was a VIP incident the entire time they were looking at the record. For that reason I created this (with some help from ChatGPT).

Utilising a client script, I was able to display an animated VIP icon that shows no matter where the engineer is on the form. It looks like this. The image is also pulsing, but I can’t show that in a screenshot so you’ll have to trust me!

I downloaded a VIP icon that I liked the look of. Personally I was a fan of this one https://www.flaticon.com/free-icon/vip_3791579.

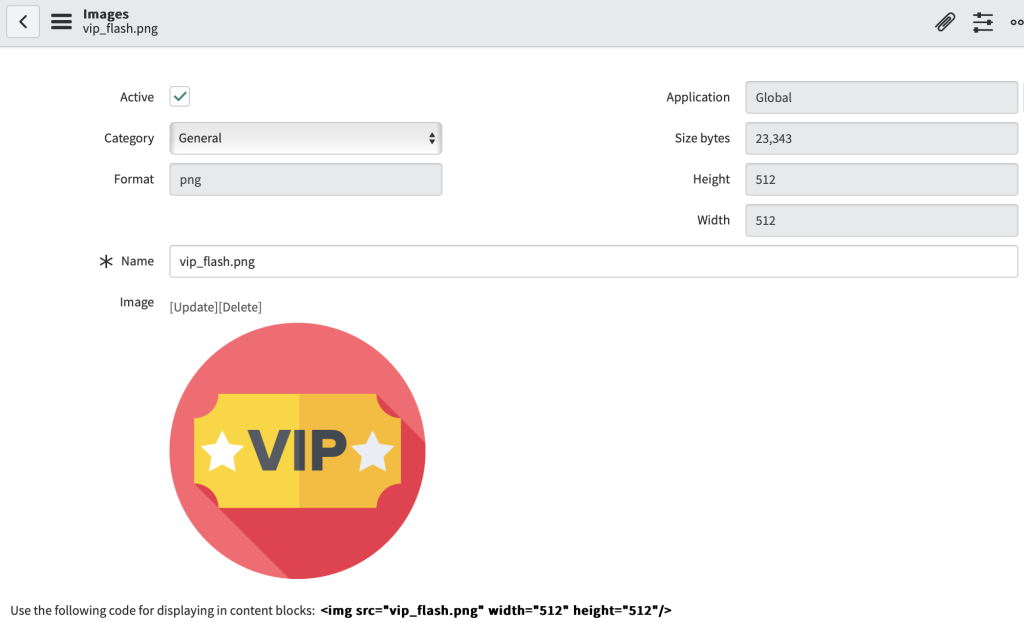
Next, you need to add it to the image library in ServiceNow. Open “Images” under “System UI”. Click “New” and upload your image. Name the image “vip_flash.png”. It should look like this when done:

Next, we need to create a client script that will utilise it. Open “Client Scripts” under “System Definition”. Click “New” and configure your client script as follows (you can adjust whatever you need to, I’m focusing on Incident for this one):

NameFlash field – VIP
DescriptionShow an animated VIP popup on the incident form.
TableIncident
UI TypeDesktop
TypeonLoad
Isolate ScriptFalse

Then for the script, add this. Effectively it uses g_form.getReference to see if the user is a VIP. If the user is, create an image element, place it and animate it. It also has a function to get the header hight values; this is to make sure it fits OK.

function onLoad() {
    // Get the reference of the caller_id field
    g_form.getReference('caller_id', function(caller) {
        // Check if the caller is a VIP
        // Double quote to convert to boolean
        if (caller.vip == "true") {
            createVIPAnimation();
        }
    });

    // Setup the onresize event handler
    window.onresize = function() {
        adjustVIPPosition();
    };
}

function createVIPAnimation() {
    // Create an image element to display the VIP image
    var vipImage = document.createElement('img');
    vipImage.src = 'vip_flash.png';
    vipImage.style.position = 'fixed';
    vipImage.style.right = '70px'; // Adjusted to position it on the right
    vipImage.style.width = '50px'; // Set the initial width to be small
    vipImage.style.height = '50px'; // Set the initial height to be small
    vipImage.style.zIndex = '10000';
    vipImage.style.animation = 'vipAnimation 2s infinite';
    vipImage.className = 'vipImage'; // Add a class name to the VIP image for easy selection later

    // Get the height of the header bar dynamically
    var headerHeight = getHeaderHeight();

    // Adjust the top property based on the header bar height
    vipImage.style.top = (headerHeight + 10) + 'px'; // Adding 10px margin to position it below the header

    document.body.appendChild(vipImage);

    // Create style element to hold the keyframes for the animation
    var styleElement = document.createElement('style');
    styleElement.type = 'text/css';
    styleElement.innerHTML = '@keyframes vipAnimation {' + 
                                '0% {' + 
                                    'transform: scale(1);' + 
                                '}' +
                                '50% {' +
                                    'transform: scale(1.1);' + 
                                '}' +
                                '100% {' +
                                    'transform: scale(1);' +
                                '}' +
                            '}';

    document.head.appendChild(styleElement);
}

function getHeaderHeight() {
    var tableName = g_form.getTableName();
    var headerId = tableName + '.form_header';
    var header = document.getElementById(headerId);

    return header ? header.offsetHeight : 0;
}

function adjustVIPPosition() {
    var header = document.getElementById(g_form.getTableName() + '.form_header');
    if (header) {
        var headerRect = header.getBoundingClientRect();
        var vipImage = document.querySelector('.vipImage');
        if (vipImage) {
            vipImage.style.top = (headerRect.bottom + 10) + 'px'; // 10px below the current bottom of the header
        }
    }
}

ServiceNow – Override Fields in the Email Client Template

I appreciate this one is a bit niche but someone out there might find it useful so I thought I’d share. I had a need to override the “To” field on the email client with a different email address. I wanted a method where I could specify an email address as a recipient which would override what was there. If there wasn’t an overriding email address provided, use the default (which would be caller_id in this instance).

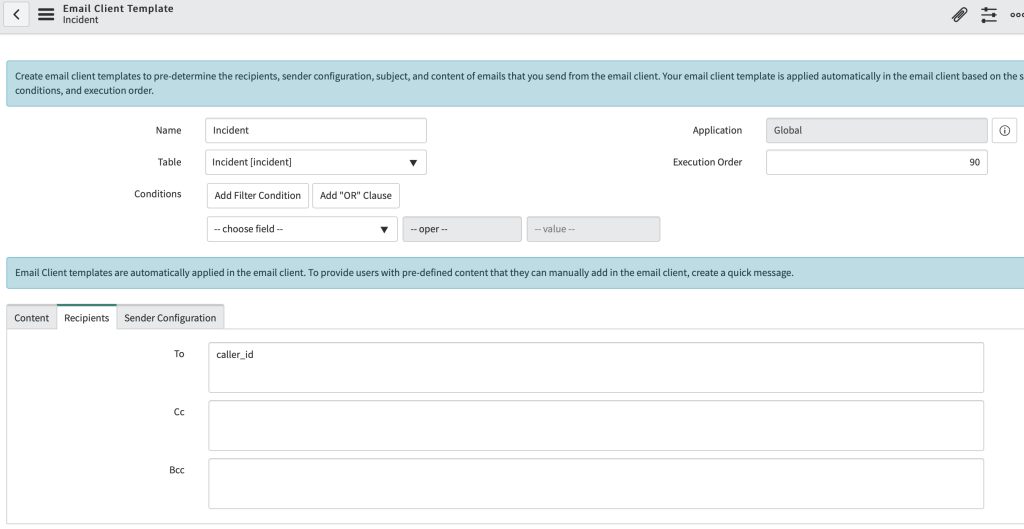
With “Email Client Templates” in ServiceNow you can specify the recipient that should be used in the “To” field (as well as “CC” and “BCC”). You can also configure other fields such as subject. For example, here is a simple configuration that is configured for the “incident” table and will default the email in the “To” field to be the user specified in the “caller_id” field.

This then works when clicking into the email client using the following:

It will bring up the mail client in the following way:

It turns out you can use Javascript in the email client template instead of a field name. I thought we might be able to use the URL to provide the recipient address in the form of a parameter which could override the “To” field; if it found a custom address in there, override the field. If not, respond with caller_id.

Firstly, I built the following script include:

TypeScript Include
NameEmailClientUtils
DescriptionCustom functions for the email client.
Client CallableFalse
var EmailClientUtils = Class.create();
EmailClientUtils.prototype = {
    initialize: function() {
        debug = true;
    },

    checkForRecipient: function(url) {

        url = String(url);
        this.logDebug("URL: " + url);

        var match = url.match(/[?&]sysparm_recipients=([^&]*)/);
        this.logDebug("MATCH:" + match);

        var return_address = match ? decodeURIComponent(match[1]) : "caller_id";
        this.logDebug("RETURN ADDRESS: " + return_address);

        return return_address;

    },

    logDebug: function() {
        if (this.debug)
            gs.log(str, "EmailClientUtils");
    },

    type: 'EmailClientUtils'
};

I then updated the email client template “To” field as follows. This makes the email client call the checkForRecipient function in the script include.

javascript:new global.EmailClientUtils().checkForRecipient(gs.action.getGlideURI())

Effectively the checkForRecipient function reads the presented URL (provided with gs.action.getClientURI()) and checks to see if there is a parameter called sysparm_recipients. If there is, extract and return the value. If not, return caller_id.

To utilise the function, I firstly created a new UI script. This adapts some functionality I found through my investigation that normally opens the email client (emailClientOpenPop) to accept a custom recipient, then adds a new parameter named sysparm_recipients with that recipient to the URL. It then opens the email client with that URL.

TypeUI Script
NameCustomEmailClient
UI TypeDesktop
GlobalTrue
var CustomEmailClient = Class.create();
CustomEmailClient.prototype = {
    initialize: function() {

    },

    emailClientOpenPopCustom: function(customRecipient) {
        var table = g_form.getTableName();
        var id = document.getElementsByName("sys_uniqueValue")[0];
        if (!id)
            return;
        var url = new GlideURL("email_client.do");
        url.addParam("sysparm_table", table);
        url.addParam("sysparm_sys_id", id.value);
        url.addParam("sysparm_target", table);
        var urlString = url.getURL() + g_form.serializeChangedAll();
        urlString += "&sysparm_recipients=" + customRecipient;
        urlString = urlString.substring(0, urlMaxLength);
        popupOpenEmailClient(urlString);
    },
};

Finally, to use all of this I thought it might be useful to have a UI macro that we could put next to a field. Then we can click it to open the email client with that address.

TypeUI Macro
Nameemail_user
DescriptionEmail user in reference field using email client.
<?xml version="1.0" encoding="utf-8"?>
<j:jelly trim="false" xmlns:j="jelly:core" xmlns:g="glide">
    <g:reference_decoration 
        id="show_email_${gs.generateGUID(this)}:${ref}" 
        field="${ref}" 
        onclick="invokeEmail('${ref}');" 
        title="${gs.getMessage('Email User')}" 
        image="images/icons/email.gifx" 
        icon="icon-mail" 
    />
    <script>
        function invokeEmail(reference) {
            var s = reference.split('.');
            var referenceField = s[1];
            var user = g_form.getReference(referenceField, emailUser);
        }

        function emailUser(user) {
            var abc = new CustomEmailClient();
            abc.emailClientOpenPopCustom(user.email);
        }
    </script>
</j:jelly>

You can then add it to a reference field by using the following in the dictionary:

ref_contributions=email_user

It will show a little email icon next to the user, like this:

And when you click the email icon, it will bring up the mail client with that user in the “To” field:

Hope this helps. I’d imagine you can use the same method for other fields on the email client template.

ServiceNow – Testing Automatic Code Entry from ChatGPT – Initial Testing

This is purely a test at the moment and still needs some work. As mentioned in my previous post, I am looking to create a ChatGPT integration that will allow for ChatGPT to enter code directly into the environment.

To do this, I added several functions into the ChatGPT script include I created in the last post. The updated script include is included at the bottom of this post.

I’m thinking to use this I might create a table to store the ChatGPT requests.

The new functions are as follows:

FunctionNotes
extractAssistantMessageUsed to extract the response message from ChatGPT. Purely to make things a bit easier.
createScriptCreates a script on the system based on the response it receives from ChatGPT.
extractCodeBlocksNOT YET USED: This script extracts the code blocks that ChatGPT returns. Not used at present but might update if there are multiple code blocks.

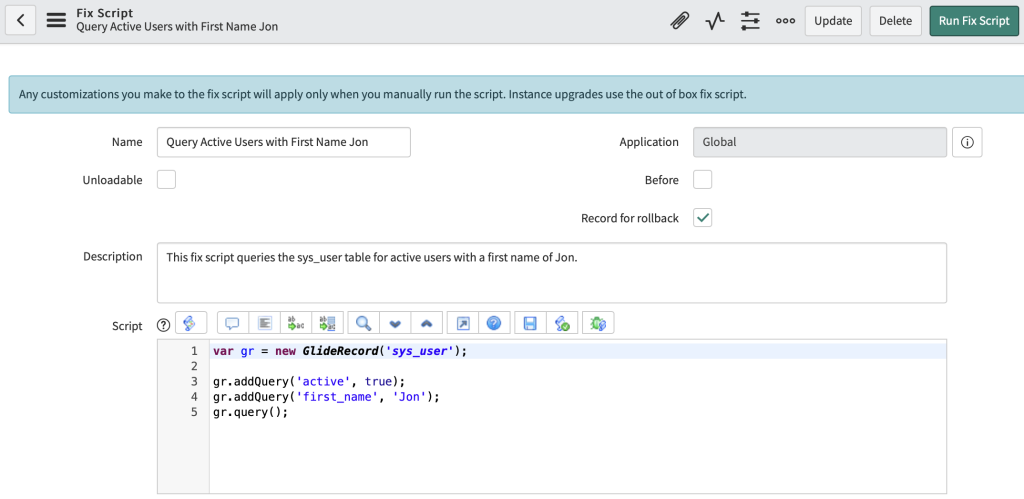
To test the process, I created a fix script. This fix script asks ChatGPT to create a ServiceNow fix script to query for active users with a first name of Jon.

var chatGPT = new global.ChatGPT();
try {
    var premise = chatGPT.setPremise("You are writing a code block for use in ServiceNow. I understand you cannot write it into ServiceNow directly. You should respond as a JSON string with no additional text. The response should have the following keys: name (used as a simple name for the script), table (the script table name, E.G. fix script is sys_script_fix), code (the code you are providing), notes (any notes you have about the code).");
    var message1 = chatGPT.createMessage("user", "Can you write me a ServiceNow fix script to query for active users with a first name of Jon.");
    var result = chatGPT.submitChat([premise, message1]);
    chatGPT.logDebug("RESULT IS: " + result);

    var extract = chatGPT.extractAssistantMessage(result);
    chatGPT.logDebug("ASSISTANT MESSAGE IS: " + extract);

    var scriptId = chatGPT.createScript(extract);
    if (scriptId) {
        chatGPT.logDebug("Script was created successfully with id: " + scriptId);
    } else {
        chatGPT.logDebug("Script creation failed.");
    }
} catch (e) {
    gs.error("Error during execution: " + e.message, "ChatGPT");
}

When you run the fix script, you get the following responses. For the result:

RESULT IS: {
  "id": "chatcmpl-XXXXXXXXXXXXXXXXX",
  "object": "chat.completion",
  "created": 1690730521,
  "model": "gpt-3.5-turbo-0613",
  "choices": [
    {
      "index": 0,
      "message": {
        "role": "assistant",
        "content": "{\n  \"name\": \"ActiveUsersWithFirstNameJon\",\n  \"table\": \"sys_script_fix\",\n  \"code\": \"var grUsers = new GlideRecord('sys_user');\\n\\\ngrUsers.addQuery('active', true);\\n\\\ngrUsers.addQuery('first_name', 'Jon');\\n\\\ngrUsers.query();\\n\\\n\\n\\\nwhile (grUsers.next()) {\\n\\\n    gs.info('User: ' + grUsers.name);\\n\\\n}\",\n  \"notes\": \"This fix script queries the sys_user table for active users with a first name of 'Jon' and logs their names using the gs.info method.\"\n}"
      },
      "finish_reason": "stop"
    }
  ],
  "usage": {
    "prompt_tokens": 121,
    "completion_tokens": 133,
    "total_tokens": 254
  }
}

For the assistant message:

ASSISTANT MESSAGE IS: {
  "name": "Query Active Users with First Name Jon",
  "table": "sys_script_fix",
  "code": "var gr = new GlideRecord('sys_user');\n\ngr.addQuery('active', true);\ngr.addQuery('first_name', 'Jon');\ngr.query();",
  "notes": "This fix script queries the sys_user table for active users with a first name of Jon."
}

If all is well, you should get some messages saying the script has been created.

ChatGPT: Creating script with name: Query Active Users with First Name Jon
ChatGPT: Script created with sys_id: 02b1a8ae475831100dbe0bdbd36d43f0
ChatGPT: Script was created successfully with id: 02b1a8ae475831100dbe0bdbd36d43f0

I have seen a few issues with the response from ChatGPT having unescaped characters that the code doesn’t like. Trying to find a way around that.

Below is the updated ChatGPT script include with the new functions and some additional logging. Hope it helps.

var ChatGPT = Class.create();
ChatGPT.prototype = {
    debug: true, // Set to true to enable logging

    initialize: function() {
        this.model = "gpt-3.5-turbo";
        this.logDebug("ChatGPT instance created with model: " + this.model);
    },

    setPremise: function(premise) {
        try {
            this.logDebug("Setting premise: " + premise);
            return this.createMessage("system", premise);
        } catch (ex) {
            var exception_message = ex.getMessage();
            gs.error(exception_message, "ChatGPT");
        }
    },

    createMessage: function(role, content) {
        try {
            this.logDebug("Creating message with role: " + role + " and content: " + content);
            return {
                "role": role,
                "content": content
            };
        } catch (ex) {
            var exception_message = ex.getMessage();
            gs.error(exception_message, "ChatGPT");
        }
    },

    submitChat: function(messages) {
        try {
            this.logDebug("Submitting chat messages: " + JSON.stringify(messages));
            var request = new sn_ws.RESTMessageV2("ChatGPT", "POST");
            request.setHttpMethod('POST');

            var payload = {
                "model": this.model,
                "messages": messages,
                "temperature": 0.7
            };

            this.logDebug("Payload: " + JSON.stringify(payload));
            request.setRequestBody(JSON.stringify(payload));

            var response = request.execute();
            var httpResponseStatus = response.getStatusCode();
            var httpResponseContentType = response.getHeader('Content-Type');

            if (httpResponseStatus === 200 && httpResponseContentType === 'application/json') {
                this.logDebug("ChatGPT API call was successful");
                this.logDebug("ChatGPT Response was: " + response.getBody());
                return response.getBody();
            } else {
                gs.error('Error calling the ChatGPT API. HTTP Status: ' + httpResponseStatus, "ChatGPT");
            }
        } catch (ex) {
            var exception_message = ex.getMessage();
            gs.error(exception_message, "ChatGPT");
        }
    },

    extractAssistantMessage: function(apiResponse) {
        try {
            var apiResponseObject = JSON.parse(apiResponse);

            if (apiResponseObject.choices && apiResponseObject.choices[0] && apiResponseObject.choices[0].message && apiResponseObject.choices[0].message.content) {
                this.logDebug("Extracted assistant message: " + apiResponseObject.choices[0].message.content);
                return apiResponseObject.choices[0].message.content;
            } else {
                gs.error("No message found in the API response.", "ChatGPT");
                return null;
            }
        } catch (ex) {
            var exception_message = ex.getMessage();
            gs.error(exception_message, "ChatGPT");
        }
    },

    extractCodeBlocks: function(assistantMessage) {
        try {
            if (!assistantMessage) {
                gs.error("Assistant message is null or undefined", "ChatGPT");
                return null;
            }

            if (typeof(assistantMessage) == "string")
                assistantMessage = JSON.parse(assistantMessage);

            var code = assistantMessage.code;

            if (!code) {
                gs.error("No code found in the assistant message.", "ChatGPT");
                return null;
            }

            return code;
        } catch (ex) {
            var exception_message = ex.getMessage();
            gs.error(exception_message, "ChatGPT");
        }
    },

    createScript: function(scriptJson) {
        try {
            if (typeof(scriptJson) == "string")
                scriptJson = JSON.parse(scriptJson);

            if (!scriptJson.name || !scriptJson.code || !scriptJson.notes || !scriptJson.table) {
                gs.error("JSON is missing required properties", "ChatGPT");
                return null;
            }

            this.logDebug("Creating script with name: " + scriptJson.name);

            var gr = new GlideRecord(scriptJson.table);
            gr.initialize();
            gr.setValue('name', scriptJson.name);
            gr.setValue('script', scriptJson.code);
            gr.setValue('description', scriptJson.notes);
            var sys_id = gr.insert();

            if (sys_id) {
                this.logDebug("Script created with sys_id: " + sys_id);
                return sys_id;
            } else {
                gs.error("Failed to create script", "ChatGPT");
                return null;
            }
        } catch (e) {
            gs.error("Failed to parse script JSON: " + e.message, "ChatGPT");
            return null;
        }
    },

    logDebug: function(log_message) {
        if (this.debug) {
            gs.log(log_message, "ChatGPT");
        }
    },

    type: 'ChatGPT'
};

ServiceNow: Automating Fix Script Generation with a UI Action

Sorry for the title; didn’t know what to call this! Ever so often I’ll run a fix script to perform some sort of action on a GlideRecord (updating an attribute on a number of records for example).

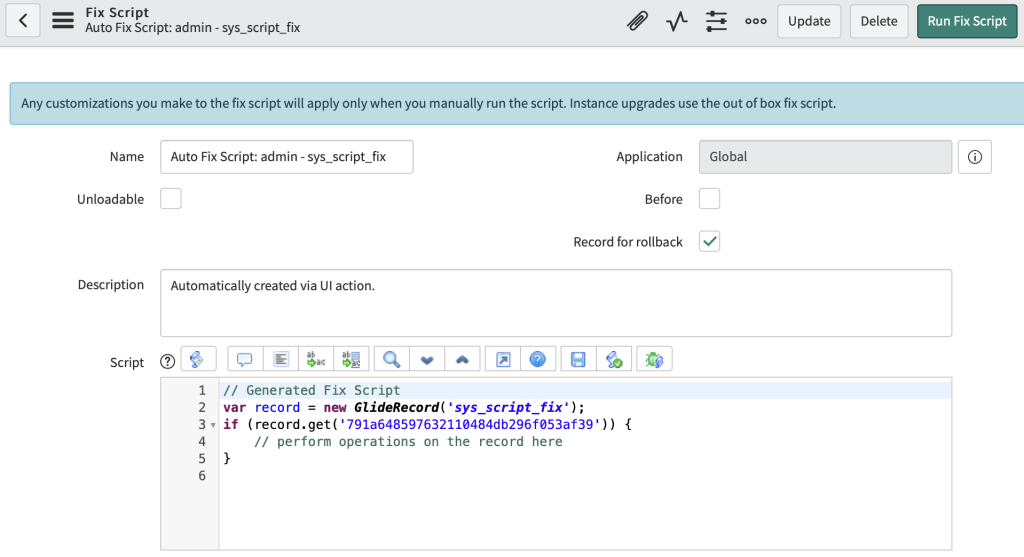
With this idea, I created a UI action that generates a fix script template based on the current record. This script includes the basic structure for loading the specific record and leaves space for you to define the operations you want to perform on it.

To implement this, you need to create a new UI action and use the provided script below. You can customize it according to your needs. I’m sharing this in case anyone else finds it as useful as I do. Let me know if you have any thoughts or suggestions for improvement! This will only show for admins due to the conditions.

NameCreate fix script to get this record
Tableglobal
Form linktrue
Show updatetrue
Conditionsgs.hasRole(“admin”)

In the script area, add the following:

// Retrieving the relevant data from the current context: table name, record ID, and user
var tableName = current.getTableName();
var recordSysId = current.sys_id.toString();
var username = gs.getUser().getName();

// Creating a unique name for the fix script, using the retrieved username and table name
var fixScriptName = "Auto Fix Script: " + username + " - " + tableName;

// Generating the fix script, which will load a record from the table and 
// then perform operations on it (operations to be defined by the user)
var fixScript =
    "// Generated Fix Script\n" +
    "var record = new GlideRecord('" + tableName + "');\n" +
    "if (record.get('" + recordSysId + "')) {\n" +
    "    // perform operations on the record here\n" +
    "}\n";

// Logging the generated script to the system log
gs.info("Generated Fix Script: \n" + fixScript);

// Creating a new record in the 'sys_script_fix' table, to save the generated fix script
var fix_script = new GlideRecord('sys_script_fix');
fix_script.name = fixScriptName;
fix_script.description = "Automatically created via UI action.";
fix_script.script = fixScript;

// Inserting the new fix script record into the system and storing the returned sys_id
var fixScriptSysId = fix_script.insert();

// Redirecting the user to the newly created fix script record in the system
action.setRedirectURL(fix_script);

Once done, submit the UI action. You should now see a new UI action appear in the form of a link on the various records. It should look something like this:

When you run the UI action on a record you should get something like this:

ServiceNow – ChatGPT Integration – Making recommendations based on short description

Thought this might be useful for somebody. This is assuming that you have already run through this post to get the initial setup done: ServiceNow – ChatGPT Integration.

This is a very basic configuration and it may be better to do it through a flow, but as an example of how you could potentially update a task (incident in this case) and provide recommendations from ChatGPT when the description is updated. This is a fairly flexible approach so you might have other ideas!

Firstly, open up the incident table. We are going to create a new column called “ChatGPT Recommendations”. Give this column the type of “String” and a max length of 2000. Copy the column name (should be u_chatgpt_recommendations) and submit.

Open the incident form and make sure the new column is showing on the form.

We will now create a business rule to deliver the result. Configure the business rule conditions as follows:

Name:Set recommendations based on description
Table:Incident
Advanced:true (checked)
When to run
When:before
Insert:true (checked)
Update:true (checked)
Short description:changes

Now on the advanced tab we will enter the following code:

(function executeRule(current, previous /*null when async*/ ) {

    // Create an instance of the ChatGPT class
    var chatGPT = new global.ChatGPT();

    // Set the premise for the chat with the assistant. The premise helps set the context of the conversation.
    var premise = chatGPT.setPremise("You are an IT professional providing recommendations to non-technical users. You should give the recommendations only, no pretext.");

    // Create a message requesting ChatGPT to send some recommendations.
    var message1 = chatGPT.createMessage("user", "Provide some recommendations for this: " + current.description);

    // Submit the chat to the GPT-3.5 Turbo model (default). The chat consists of the premise and the user's request.
    // The 'submitChat' function accepts an array of messages which form a conversation.
    var result = chatGPT.submitChat([premise, message1]);

    // Extract only the response from the message.
    var extracted_message = chatGPT.extractAssistantMessage(result);

	// Populate our new field.
    current.u_chatgpt_recommendations = extracted_message;

})(current, previous);

Once submitted, we should be good to go! As an example, I logged a new incident about my monitor being broken. The system showed the following:

ServiceNow – ChatGPT Integration

ServiceNow have just started offering some tools for ChatGPT integration. Some of these fall under their IntegrationHub Pro offering. Its well worth checking out the new official options in my opinion.

I thought I would try to setup my own integration with ChatGPT on a personal instance a while ago and just got round to it. I thought I’d document the process here for if anyone was interested.

I’ll write a few of these articles as there was an idea that I had which I thought might be useful. What I am trying to achieve is the ability to ask ChatGPT to write a script, then have ServiceNow create the script on the platform.

To do the initial setup, do the following:

Create a ChatGPT API Key

Open the following link and create an API key. https://platform.openai.com/account/api-keys

As an FYI, the key is separate from any ChatGPT plus subscription you might have – it will likely come under a new billing process. Once you have created the key, note it down and continue on with creating a REST message.

Create a new REST Message

In ServiceNow, open “REST Message” under System Web Services.

Create a new REST message. Enter the following details:

  • Name: ChatGPT
  • Endpoint: https://api.openai.com/v1/chat/completions
  • Open the “HTTP Request” tab. Create two new HTTP headers as follows:
NameValueExample
AuthorizationBearer [API Key]Bearer sk-xyzxxxxxxxxxxx
Content-Typeapplication/json

Create a new “HTTP Method” with the following details. You can delete the default GET.

NameHttp MethodEndpoint
POSTPOSThttps://api.openai.com/v1/chat/completions

You should now have the bones in place to send the messages, now we need to write some code to submit the requests.

Create Script Include

We will now create a Script Include that can be used to process ChatGPT requests. Below is the initial code I have used.

NameAPI Name (automatically generated)
ChatGPTglobal.ChatGPT
var ChatGPT = Class.create();
ChatGPT.prototype = {
    initialize: function() {
        this.model = "gpt-3.5-turbo";
        // Uncomment the following line if you want to use "gpt-4" model
        // this.model = "gpt-4"; // Note: There is a waitlist for this.

        gs.info("ChatGPT instance created with model: " + this.model, "ChatGPT");
    },

    // Sets the premise for the chat
    setPremise: function(premise) {
        gs.info("Setting premise: " + premise, "ChatGPT");
        return this.createMessage("system", premise);
    },

    // Creates a message object with role and content
    createMessage: function(role, content) {
        gs.info("Creating message with role: " + role + " and content: " + content, "ChatGPT");
        return {
            "role": role,
            "content": content
        };
    },

    // Submits chat messages to the model applied in this script include
    submitChat: function(messages) {
        gs.info("Submitting chat messages: " + JSON.stringify(messages), "ChatGPT");

        try {
            // Create a new GlideHTTPRequest instance and set the endpoint URL
            var request = new sn_ws.RESTMessageV2("ChatGPT", "POST");
            request.setHttpMethod('POST');

            // Set the payload including model, messages, and temperature
            var payload = {
                "model": this.model,
                "messages": messages,
                "temperature": 0.7
            };

            // Log the payload for debugging purposes
            gs.info("Payload: " + JSON.stringify(payload), "ChatGPT");

            // Set the request body
            request.setRequestBody(JSON.stringify(payload));

            // Send the request
            var response = request.execute();

            // Get the response status and content type
            var httpResponseStatus = response.getStatusCode();
            var httpResponseContentType = response.getHeader('Content-Type');

            // If the request is successful and the content type is JSON
            if (httpResponseStatus === 200 && httpResponseContentType === 'application/json') {
                gs.info("ChatGPT API call was successful", "ChatGPT");
                return response.getBody();
            } else {
                gs.error('Error calling the ChatGPT API. HTTP Status: ' + httpResponseStatus, "ChatGPT");
            }
        } catch (ex) {
            // Log any exception that happens during the API call
            var exception_message = ex.getMessage();
            gs.error(exception_message, "ChatGPT");
        }
    },

    type: 'ChatGPT'
};

A bit around the functions:

FunctionNotes
setPremiseCan be used to set the premise of a conversation. For example, you could want ChatGPT to reply in a certain style, or in a certain format. The premise could be something like, “You are speaking to a non-technical user so any answers should be summarised for that audience”.
createMessageUsed to create the message you are about to send, with two variables; role and content. Generally this is to aid with conversational context which I’ll talk about in future. To use it, call the function with the role as “user” and the content as the message you want to sent.
submitChatThis function sends the message to the ChatGPT endpoint using the REST message we defined earlier. It takes an array of messages, so you can use the createMessage function and send that though, or use the setPremise function initially to set the premise of the chat and send a message after etc.

Testing the code

To test if the code works, you can create a fix script. Here is an example that sets the premise that ChatGPT is a comedian and we can ask for its thoughts on rainy weather.

// Create an instance of the ChatGPT class
var chatGPT = new global.ChatGPT();

// Set the premise for the chat with the assistant. The premise helps set the context of the conversation
var premise = chatGPT.setPremise("You are a comedian and you love to make people laugh. Your responses should be comedic");

// Create a user message asking the assistant to write a ServiceNow fix script to query for active users.
var message1 = chatGPT.createMessage("user", "What do you think about rainy weather?");

// Submit the chat to the GPT-3.5 Turbo model (default). The chat consists of the premise and the user's request.
// The 'submitChat' function accepts an array of messages which form a conversation.
var result = chatGPT.submitChat([premise, message1]);

// Print the result. This will be a JSON object as per the premise set for the chat.
gs.print(result);

You should have a payload like this:

{
    "model": "gpt-3.5-turbo",
    "messages":
    [
        {
            "role": "system",
            "content": "You are a comedian and you love to make people laugh. Your responses should be comedic"
        },
        {
            "role": "user",
            "content": "What do you think about rainy weather?"
        }
    ],
    "temperature": 0.7
}

You should get a response like this:

{
  "id": "chatcmpl-XXXXXXXXXXXXXXXX",
  "object": "chat.completion",
  "created": 1686498256,
  "model": "gpt-3.5-turbo-0301",
  "usage": {
    "prompt_tokens": 38,
    "completion_tokens": 56,
    "total_tokens": 94
  },
  "choices": [
    {
      "message": {
        "role": "assistant",
        "content": "Rainy weather? Oh, it's the perfect time to stay curled up in bed all day and pretend like you have a life. Plus, it's the only time you can use the excuse \"sorry, can't go out, it's raining\" to avoid social situations."
      },
      "finish_reason": "stop",
      "index": 0
    }
  ]
}

As you can see, ChatGPT sent a message back with the role of “assistant”. I hope this helps! I’ll be writing more articles around this with an aim to get the automatic code deployment working.

ServiceNow – Automating Bank Holidays (U.K.)

I wanted to share this potentially useful tip related to ServiceNow schedules. There might be instances when you need to use schedules, such as managing SLAs that should only trigger during work hours.

Setting up schedules is generally straightforward, but sometimes you need to exclude specific dates like bank holidays. The UK government has provided a JSON formatted list of UK bank holidays, accessible here:

https://www.api.gov.uk/gds/bank-holidays/#bank-holidays

This resource is really useful for populating bank holidays automatically. I created a new schedule, populate it with entries from the JSON data, and then referenced this schedule. If you’d like to use the same approach, here’s the script I used. You only need to replace ‘schedule_sys_id’ with the sys_id of your new schedule.

// SysID of the schedule to be updated
var schedule_sys_id = 'XXXXXXXXXXXXXXXXXXXXXXXXXXXXXXXX'; 

// Create a new instance of RESTMessageV2 for HTTP requests
var request = new sn_ws.RESTMessageV2();

// Set the endpoint of the HTTP request
request.setEndpoint('https://www.gov.uk/bank-holidays.json');

// Set the method to GET to fetch data
request.setHttpMethod('GET');

// Set the header to accept application/json
request.setRequestHeader("Accept","application/json");

// Execute the HTTP request and store the response
var response = request.execute();
gs.info('HTTP request sent to fetch bank holidays');

// Get the response body
var str = response.getBody();

// Parse the JSON string into a JavaScript object
var obj = JSON.parse(str);

// Extract the list of holidays for England and Wales
var ukHolidays = obj['england-and-wales'].events;
gs.info('Fetched ' + ukHolidays.length + ' UK bank holidays');

// Loop over each bank holiday
for (var bankHoliday in ukHolidays) {
	// Check if the current property belongs to the object itself
	if(!ukHolidays.hasOwnProperty(bankHoliday)) continue;
	
	// Extract the title, date, and notes of the bank holiday
	var title = ukHolidays[bankHoliday].title;
	var date = ukHolidays[bankHoliday].date;
	var notes = ukHolidays[bankHoliday].notes;

	// Convert the date into a GlideDateTime object
	var gdt = new GlideDateTime(date);
	
	// Query the 'cmn_schedule_span' table to check if the record already exists
	var checkFirst = new GlideRecord('cmn_schedule_span');
	checkFirst.addQuery('schedule', schedule_sys_id);
	checkFirst.addQuery('name',(title + ' - ' + gdt.getYearUTC()));
	checkFirst.query();
	
	// If the record doesn't exist, create a new one
	if (!checkFirst.hasNext()){
		var gr = new GlideRecord('cmn_schedule_span');
		gr.initialize();
		gr.schedule = schedule_sys_id;
		gr.name = (title + ' - ' + gdt.getYearUTC());
		gr.type = 'exclude';
		gr.show_as = 'busy';
		gr.all_day = true;
		gr.start_date_time = gdt.getDate().toString();
		gdt.addDays(1);
		gr.end_date_time = gdt.getDate().toString();
		gr.notes = notes;
		gr.insert();
		gs.info('Added bank holiday: ' + title + ' - ' + gdt.getYearUTC());
	} else {
		gs.warn('Bank holiday already exists in the schedule: ' + title + ' - ' + gdt.getYearUTC());
	}
}

ChatGPT – Truncation of Responses

ChatGPT has already proven to be an incredibly powerful tool. People are launching phenomenal projects with it, showcasing its potential as a transformative technology. Some have even referred to it as the “iPhone moment” for AI, and I can’t help but agree.

That being said, like any tool, it does have its quirks. One common issue is the truncation of responses. For instance, while generating code, ChatGPT might abruptly cut off, prompting you to “regenerate response” and leading to the repetition of the same text.

If you encounter this, there are strategies to mitigate it. One simple method is to prompt the model with:

“Please continue.”

This command typically gets ChatGPT to carry on from where it left off. However, it’s worth noting that there can be peculiarities with this approach. If the AI halts during a code block, it may resume the code but not within the same code block.

A more effective workaround I’ve found involves pinpointing the most recent function it began to write (or any line of code you want to continue from) and instructing it to:

“Please continue from function [function name] onwards.”

This method usually results in the continuation of the code within a proper code block.

TradingView – Cannot use ‘barcolor’ in local scope

Ran into this issue a few times when trying to set the bar or background colour in a pine script. Its a relatively simple fix, but it can trip you up the first time you see it.

For example, this is a super simple RSI script. I’m attempting to set the bar colour if the RSI value is above 80:

//@version=5
indicator(shorttitle="RSI Script", title="Simple RSI Script", overlay = false)
length = input(14, title="RSI Period")
overBought = input(70, title="Overbought Level")
overSold = input(30, title="Oversold Level")

rsiValue = ta.rsi(close, length)

plot(rsiValue, title="RSI", color=color.blue)
hline(overBought, title="Overbought Level", color=color.red)
hline(overSold, title="Oversold Level", color=color.green)

if (rsiValue > 80)
    barcolor(color=color.red)

However, if I try to add this script to the chart I get the error “Cannot use ‘barcolor’ in local scope”.

To get around this, remove the if statement and use something like the following:

myColour = (rsiValue > 80) ? color.purple : na
barcolor(color=myColour)

Effectively this either sets the bar colour to purple if RSI value is above 80, or na if it’s not. Full script below for clarity:

//@version=5
indicator(shorttitle="RSI Script", title="Simple RSI Script", overlay = false)
length = input(14, title="RSI Period")
overBought = input(70, title="Overbought Level")
overSold = input(30, title="Oversold Level")

rsiValue = ta.rsi(close, length)

plot(rsiValue, title="RSI", color=color.blue)
hline(overBought, title="Overbought Level", color=color.red)
hline(overSold, title="Oversold Level", color=color.green)

myColour = (rsiValue > 80) ? color.purple : na
barcolor(color=myColour)